Are you an amateur astronomer looking for the best telescopes for travel to take on your next adventure? Whether you dream of chasing a lunar eclipse from the African savanna or spotting galaxies beyond the horizon, portable telescopes are making it easier than ever before to join in on stargazing wherever you wander. In this blog post, we’ll tell you everything you need to know about choosing and transporting a travel telescope so that your astronomy journey is as rewarding and hassle-free as possible. So grab your star map, prepare yourself for countless nights spent gazing upon breathtaking cosmic wonders, and let’s get started.
List of Top 10 Best Telescopes for Travel
Here is a list of the top 10 best telescopes for travel with their specifications. These telescopes are perfect for stargazing enthusiasts who want to explore the night sky while on the go.

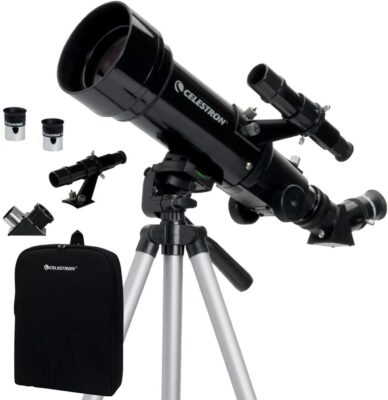
Get ready to explore the universe like never before with Celestron’s 70mm Travel Scope! Designed for maximum portability, it delivers superior optics in an incredibly small package. The Travel Scope comes complete with fully-coated glass optics, a potent 70mm objective lens, and a full-height tripod so you can get up close and personal wherever you go. Two high-quality eyepieces (20mm and 10mm) are included to provide low- and high-power views of galaxies, star clusters, and other celestial bodies.
Plus, the large 70mm objective lens gives you brighter, more detailed images for impressive clarity every time. To make it easier to transport your telescope on your next sky gazing adventure, there’s also a bonus bag, custom backpack, and software included so that you can captivate everyone with breathtaking views of the wonderful cosmos above. With Celestron’s 70mm Travel Scope, embark on the journey of a lifetime.
Specs:
- Brand: Celestron
- Model: 21035
- Objective lens diameter: 70 Millimeters
- Weight: 3.3 Pounds
- Dimensions: 18″D x 7″W x 14″H
[joomdev-wpc-pros-cons disable_title=”yes” wpc_style=”wppc-view1″ title_tag=”H3″ title=”Title Here” pros_title=”Pros” cons_title=”Cons” button_text=”Get it now” disable_button=”yes” button_link=”” button_link_target=”_SELF” button_rel_attr=”dofollow” verdict_text=””][joomdev-wpc-pros]
- Lightweight and easy to carry.
- It has a large objective lens that provides brighter, more detailed views.
- It comes with two high-quality eyepieces for low- and high-power views.
[/joomdev-wpc-pros][joomdev-wpc-cons]
[/joomdev-wpc-cons][/joomdev-wpc-pros-cons]

Introducing the Celestron 80mm Travel Scope the perfect telescope for astronomy beginners. Portable, yet powerful, this 80mm refractor telescope comes complete with fully-coated glass optics and two high-quality eyepieces (20mm and 10mm) that provide both low and high-power views of the night sky. The large aperture objective lens provides brighter, more detailed views compared to competitors in its class.
Plus, it’s easy to take your Telescope anywhere with the included travel backpack, tripod, and additional bonus accessories. With Celestron’s quality unmatched by anyone else in its class and unbeatable convenience, you won’t find a better value out there. See galaxies far away if you have a clear day, or observatory wildlife right at your own home.
Specs:
- Brand: Celestron
- Model: Travel Scope 80 Portable Telescope with Smartphone Adapter
- Objective lens diameter: 80 Millimeters
- Mount: Altazimuth Mount
- Weight: 4.5 Pounds
- Dimensions: 22.5″D x 12.7″W x 5.6″H
[joomdev-wpc-pros-cons disable_title=”yes” wpc_style=”wppc-view1″ title_tag=”H3″ title=”Title Here” pros_title=”Pros” cons_title=”Cons” button_text=”Get it now” disable_button=”yes” button_link=”” button_link_target=”_SELF” button_rel_attr=”dofollow” verdict_text=””][joomdev-wpc-pros]
- Perfect for beginners.
- It comes with fully-coated glass optics.
- You can use the included tripod and backpack to take your telescope anywhere.
[/joomdev-wpc-pros][joomdev-wpc-cons]
- While this telescope can provide great views of the night sky, it may not be ideal for observing wildlife or other objects on earth.
[/joomdev-wpc-cons][/joomdev-wpc-pros-cons]
Introducing Orion’s StarBlast 62mm Compact Travel Refractor Telescope, the perfect telescope for any astronomer on the go! Whether you’re an experienced observer or a beginner just getting into the fold, this telescope has something to offer. With its 4-element lens system and versatile design, you’ll experience crisp and detailed views of celestial marvels both day and night. From our distant Moon and planets to bright deep sky objects like nebulae and galaxies this refractor won’t fail to impress.
And because we know versatility is key when it comes to stargazing, this telescope is also great for checking out wildlife and other objects close at hand too. Plus, with its smooth Crawford focuser and a sturdy hard case, you can take your adventure with confidence wherever you go.
Included with your purchase are a 45-degree correct-image diagonal, 20mm and 4mm Plossl eyepieces, plus much more! So look no further get yourself an Orion 10149 StarBlast 62mm Compact Travel Refractor Telescope today and have an unforgettable journey through the night sky from anywhere you travel.
Specs:
- Brand: Orion
- Eye Piece Lens: Plossl
- Objective lens diameter: 62 Millimeters
- Optical Tube Length: 12.8 Inches
- Weight: 3.1 Pounds
- Lens Coating: Fully Multi-Coated
[joomdev-wpc-pros-cons disable_title=”yes” wpc_style=”wppc-view1″ title_tag=”H3″ title=”Title Here” pros_title=”Pros” cons_title=”Cons” button_text=”Get it now” disable_button=”yes” button_link=”” button_link_target=”_SELF” button_rel_attr=”dofollow” verdict_text=””][joomdev-wpc-pros]
- Get a great telescope for a fraction of the price.
- Take it with you wherever you go.
- View objects in great detail.
[/joomdev-wpc-pros][joomdev-wpc-cons]
[/joomdev-wpc-cons][/joomdev-wpc-pros-cons]
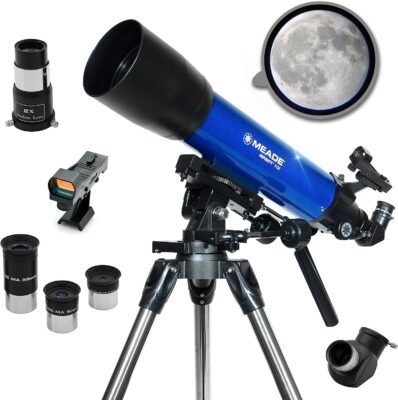
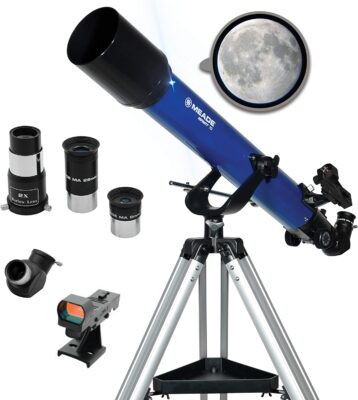
Welcome to the stars with your new Meade Instruments Infinity 102mm Aperture Portable Refracting Astronomy Telescope! Keep the night sky right in your backyard, and explore galaxies and nebulas under starry skies with this high-quality telescope. With its 102mm aperture, 600mm focal length, and f/5.9 ratio, you’ll be seeing things from here you never even knew existed. And with our easy to use altazimuth mount and slow motion controls, tracking those stars will be a breeze.
You can choose from low (26mm), medium (9mm), and high (6.3mm) magnification eyepieces for any viewing situation plus if you need an extra boost of power, try our 2x Barlow lens that doubles the magnifying power of each eyepiece. And we make it easier to focus on what you want to see our red dot viewfinder helps you point precisely where you want to observe in the night sky, while an accessory tray stores all your accessories when not in use.
We’ve got some helpful tools to help guide your exploration too Astronomical Software is included as well as an Instructional DVD. So look up it’s time to explore the stars like never before with Meade Instruments Infinity 102mm Aperture Portable Refracting Astronomy Telescope.
Specs:
- Brand: MEADE
- Model: Infinity
- Objective lens diameter: 102 Millimeters
- Mount: Altazimuth Mount
- Weight: 12.2 Pounds
- Dimensions: 34″D x 34″W x 53″H
[joomdev-wpc-pros-cons disable_title=”yes” wpc_style=”wppc-view1″ title_tag=”H3″ title=”Title Here” pros_title=”Pros” cons_title=”Cons” button_text=”Get it now” disable_button=”yes” button_link=”” button_link_target=”_SELF” button_rel_attr=”dofollow” verdict_text=””][joomdev-wpc-pros]
- 2x Barlow lens.
- You can see objects in the sky more clearly.
- This telescope is easy to use.
- Enjoy watching the stars and planets at night.
[/joomdev-wpc-pros][joomdev-wpc-cons]
[/joomdev-wpc-cons][/joomdev-wpc-pros-cons]

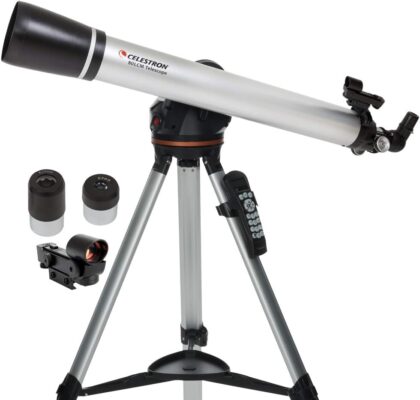
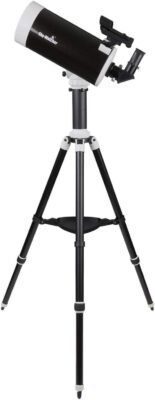
Are you ready to discover a whole universe of galactic wonders? The Celestron NexStar 90SLT Computerized Telescope is the perfect way to do it. With this stunning telescope, you’ll be able to see stars, galaxies, and nebulae in stunning HD detail with pinpoint accuracy. And thanks to its ultra-compact, portable design, this telescope makes for the ideal exploration tool for weekend trips or excursions to dark sky sites. So don’t let its small size fool you this telescope packs a powerful punch despite its size.
The NexStar 90SLT’s sophisticated Maksutov-Cassegrain optical design allows it to capture vast amounts of light from distant celestial bodies and project them in breathtaking clarity. Look up at the night sky and observe Saturn’s rings, Jupiter’s cloud bands, and the moon with incredible detail. With Salcelon’s unique SkyAlign procedure, you’ll be observing these miraculous sights with minimal setup time it gives users an effortless experience that sets up in minutes.
Don’t wait any longer to unlock the mysteries of space get your hands on the Celestron NexStar 90SLT Computerized Telescope today. Let this remarkable tool guide you on an incredible journey of discovery as you explore all the universe has to offer.
Specs:
- Brand: Celestron
- Model: 22087
- Objective lens diameter: 90 Millimeters
- Mount: Altazimuth Mount
- Weight: 11.99 Pounds
- Dimensions: 16″D x 32″W x 54″H
[joomdev-wpc-pros-cons disable_title=”yes” wpc_style=”wppc-view1″ title_tag=”H3″ title=”Title Here” pros_title=”Pros” cons_title=”Cons” button_text=”Get it now” disable_button=”yes” button_link=”” button_link_target=”_SELF” button_rel_attr=”dofollow” verdict_text=””][joomdev-wpc-pros]
- Able to see stars, galaxies, and nebulae in stunning HD detail with pinpoint accuracy.
- Objective lens diameter of 90 Millimeters.
- Ready to observe in minutes with SkyAlign.
[/joomdev-wpc-pros][joomdev-wpc-cons]
- This may be frustrating for beginners who are not yet familiar with the night sky.
[/joomdev-wpc-cons][/joomdev-wpc-pros-cons]
Take your astronomical practice to the next level with the Sky-Watcher AZ-GTi Modular Go-To Alt-Az Tracking Mount! Ideal for mobile, on-the-go astronomers, this remarkable device is both lightweight and travel-sized. Taking it with you on your next journey has never been easier.
The package also includes Sky-Watcher’s 127mm SkyMax Maksutov-Cassegrain telescope, giving you the power of high magnification and exceptional contrast in a compact form. This combination allows you to take your imaging skills farther than ever before – all with one device! The mount also boasts an impressive 11-pound payload capacity which is enough space to house most DSLR cameras as well as telescope tubes.
Now with state of the art WiFi capabilities, the AZ-GTi allows you to control it all from your smartphone or tablet. With its time-lapse features and easy, app-controlled interface, capturing celestial features like galaxies and constellations has never been more convenient. Explore the stars with precision and accuracy from anywhere in the world using the one and only Sky-Watcher AZ GTi mount.
Specs:
- Brand: Sky-Watcher
- Model: S21130
- Objective lens diameter: 127 Millimeters
- Mount: Altazimuth Mount
- Weight: 18 Pounds
- Dimensions: 9.1 x 9.1 x 9.1 inches
[joomdev-wpc-pros-cons disable_title=”yes” wpc_style=”wppc-view1″ title_tag=”H3″ title=”Title Here” pros_title=”Pros” cons_title=”Cons” button_text=”Get it now” disable_button=”yes” button_link=”” button_link_target=”_SELF” button_rel_attr=”dofollow” verdict_text=””][joomdev-wpc-pros]
- Weighs just 8.6 pounds for easy transport.
- 127mm SkyMax Maksutov-Cassegrain for high magnification.
- 11-pound payload capacity.
[/joomdev-wpc-pros][joomdev-wpc-cons]
[/joomdev-wpc-cons][/joomdev-wpc-pros-cons]
Experience the ultimate combination of clarity, portability, and versatility with the Sky-Watcher EvoStar 72 APO Doublet Refractor! Featuring expertly matched glass and outstanding color correction, you won’t find a better refractor for visually stunning night sky images. The doublet objective includes one synthetic fluorite element to ensure crisp, accurate colors while its compact design makes this telescope easy to transport as you go.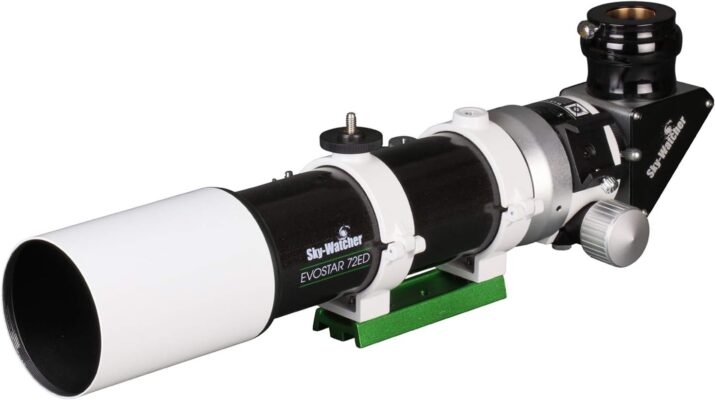
No matter your skill set level, you can rely on the EvoStar refractor. It’s ideal for novice star gazers or seasoned astrophotographers alike. Thanks to its high quality construction with Metallic High-Transmission Coatings (MHTC), you can guarantee a lifetime of beautiful views of the stars with minimal aberrations.
Don’t wait another minute to experience the best stargazing out there choose the Sky-Watcher EvoStar 72 tonight.
Specs:
- Brand: Sky Watcher
- Model: Sky Watcher USA
- Objective lens diameter: 72 Millimeters
- Weight: 4.3 Pounds
- Dimensions: 16.5″D x 3.5″W x 3.5″H
[joomdev-wpc-pros-cons disable_title=”yes” wpc_style=”wppc-view1″ title_tag=”H3″ title=”Title Here” pros_title=”Pros” cons_title=”Cons” button_text=”Get it now” disable_button=”yes” button_link=”” button_link_target=”_SELF” button_rel_attr=”dofollow” verdict_text=””][joomdev-wpc-pros]
- Superior color correction and image quality.
- Its Portable design is easy to transport and lightweight.
- Evolves with your skill set.
[/joomdev-wpc-pros][joomdev-wpc-cons]
- To get the most out of the telescope, additional equipment such as eyepieces, mount, and tripod are required.
[/joomdev-wpc-cons][/joomdev-wpc-pros-cons]
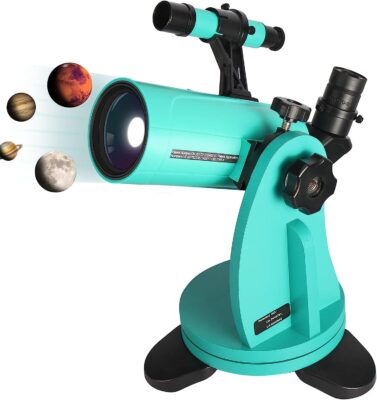
Ready for an adventure of a lifetime? Get away from the hustle and bustle of your everyday life with the Orion 10022 StarMax 90mm TableTop Maksutov-Cassegrain Telescope. This powerful telescope is not only lightweight and compact, but it is also easy to take just about anywhere with you! With its 90mm aperture Maksutov-Cassegrain design, you will be able to capture beautiful views of brighter deep space objects like nebulas and globular clusters.
Plus, you’ll be able to observe our Moon and planets like Jupiter, Saturn, and Mars in incredible detail. It also comes with two 1.25” eyepieces (25mm & 10mm focal lengths) so you can make the most of your experience.
Keep in mind that its stable tabletop base gives you a foundation to set it on any sturdy table or attach it onto a field tripod with either a 3/8” or 1/4″-20 threaded post. So what are you waiting for? Let’s explore beyond our world today with the Orion 10022 StarMax 90mm TableTop Maksutov-Cassegrain Telescope.
Specs:
- Brand: Orion
- Objective lens diameter: 90 Millimeters
- Focus Type: Manual Focus
- Weight: 6.5 Pounds
- Dimensions: 19.5″D x 10.5″W x 10.5″H
[joomdev-wpc-pros-cons disable_title=”yes” wpc_style=”wppc-view1″ title_tag=”H3″ title=”Title Here” pros_title=”Pros” cons_title=”Cons” button_text=”Get it now” disable_button=”yes” button_link=”” button_link_target=”_SELF” button_rel_attr=”dofollow” verdict_text=””][joomdev-wpc-pros]
- Take powerful views of the moon and planets with you wherever you go.
- It’s easy to carry around.
- 90mm aperture gathers enough light for beautiful views of deep-space objects.
[/joomdev-wpc-pros][joomdev-wpc-cons]
- Challenging for Beginners.
[/joomdev-wpc-cons][/joomdev-wpc-pros-cons]
Are you looking to explore the stars and galaxies in the night sky? Look no further than Telescope 80mm Aperture 600mm Astronomical Portable Refracting Telescope. This is a great telescope for both adults and kids alike that provides an enhanced viewing experience. With its excellent quality optics, this telescope features an 80mm aperture for greater light capture and multi-coated all-optical lenses for increased brightness and clarity. It also boasts two replaceable eyepieces (25mm and 10mm) offering 24x and 60x magnification respectively, as well as a 3x Barlow lens to amplify the magnifying power of each eyepiece up to a resolution of 72 or 180 times, making it perfect for closer observation of the moon’s features.
The portability factor of this telescope is also second to none thanks to its adjustable aluminum tripod and wireless remote control, enabling users to take their viewing experience wherever they go! Plus, with its simple setup process, you can start stargazing in no time. So don’t wait to become an astronomer today with Telescope with an 80mm Aperture and a 600mm Astronomical Portable Refracting Telescope.
Specs:
- Brand: HEXEUM
- Objective lens diameter: 80 Millimeters
- Eye Piece Lens: Barlow
- Mount: Altazimuth Mount
- Focus Type: Manual Focus
- Weight: 6.5 Pounds
- Dimensions: 23.4″D x 5.4″W x 7.9″H
[joomdev-wpc-pros-cons disable_title=”yes” wpc_style=”wppc-view1″ title_tag=”H3″ title=”Title Here” pros_title=”Pros” cons_title=”Cons” button_text=”Get it now” disable_button=”yes” button_link=”” button_link_target=”_SELF” button_rel_attr=”dofollow” verdict_text=””][joomdev-wpc-pros]
- Get a closer look at the stars and planets.
- Capture amazing images of the night sky.
- Feel like a kid again, looking up at the stars in wonder.
[/joomdev-wpc-pros][joomdev-wpc-cons]
- Limited magnification range.
[/joomdev-wpc-cons][/joomdev-wpc-pros-cons]
Uncover the mysteries of the night sky with Gskyer’s professional-grade 130EQ Reflector Telescope. This reflector telescope has a 5.1-inch aperture and all-glass optics for enhanced brightness and clarity, perfect for observing the Moon, planets, galaxies, nebulas, and star clusters. Also included is a 3X Barlow lens, 3 interchangeable eyepieces, a finderscope, and an adjustable tripod that will ensure you get the best viewing experience from any position.
Plus, with its wireless remote control that allows you to connect it to your iPhone or Android device via Bluetooth, you can take pictures or videos and share them with your friends and family.  Whether you’re a beginner astronomer or an experienced stargazer, Gskyer’s 130EQ reflector telescope is the perfect choice for unlocking the wonders of the heavens.
Specs:
- Brand: Gskyer
- Model: EQ 130
- Objective lens diameter: 130 Millimeters
- Eye Piece Lens: Barlow
- Mount: Equatorial Mount
- Focus Type: Manual Focus
- Weight: 30.1 Pounds
- Dimensions: 33.7″D x 9.3″W x 18.4″H
[joomdev-wpc-pros-cons disable_title=”yes” wpc_style=”wppc-view1″ title_tag=”H3″ title=”Title Here” pros_title=”Pros” cons_title=”Cons” button_text=”Get it now” disable_button=”yes” button_link=”” button_link_target=”_SELF” button_rel_attr=”dofollow” verdict_text=””][joomdev-wpc-pros]
- Explore the night sky.
- Bright and clear images.
- 3 eyepieces, a 3X Barlow lens, a finderscope, and an adjustable tripod included.
[/joomdev-wpc-pros][joomdev-wpc-cons]
- Telescope can be challenging to move and transport.
[/joomdev-wpc-cons][/joomdev-wpc-pros-cons]
Buying Guide Best telescopes for travel
When it comes to finding the best telescope for travel, there are several things to consider. First, it’s important to choose one that is lightweight and easy to transport. Make sure that it can fit easily into a backpack or suitcase so that it won’t take up too much space when you need to move it from place to place. Additionally, look for one that has an adjustable tripod as this will make set-up simpler and more convenient no matter where you go.
Another factor to consider when shopping for a portable telescope is its optical performance. The aperture size or how large the lens is will determine the amount of light it can capture and how detailed your images will be. Generally speaking, the larger the aperture size of your telescope, the better its performance will be. Finally, take note of its magnification power as this will also affect how clear your images appear during observation sessions.
Lastly, consider what accessories come with your purchase so that you have everything needed before beginning your journey. This includes things like eyepieces, filters, Barlow lenses, and other add-ons which may help improve your viewing session depending on what type of objects or celestial bodies you plan on observing while traveling.
You can check reviews of telescopes here
Conclusion:
With this buying guide in mind, now all that’s left is choosing the right telescope for travel! Keep in mind all the factors mentioned above when making your decision so that you can enjoy spectacular views wherever your travels might take you! With an array of options out there in various sizes and configurations available at multiple price points, there’s bound to be something perfect for all types of travelers looking for amazing night skies.
FAQs
What are the best telescopes for travel?
The best telescopes for travel are those that offer portability, quality optics, and durability. High-end models such as Celestron NexStar 6SE Telescope or Meade ETX-90 Observer Telescope offer excellent optics and a compact design that make them ideal for taking on trips without sacrificing image quality.
How do I ensure my telescope is portable?
When shopping for a telescope for travel, look for compact designs that can fit in a suitcase or backpack and have lightweight construction materials. Telescopes with removable optical tubes can be more portable than larger models with non-removable tubes. Additionally, many telescopes come with tripod and mount systems that can be collapsed to make them easier to transport.
How do I choose the right telescope power?
The power of a telescope is determined by its aperture size, the larger the aperture, the higher the magnification power of the eyepiece lens. For general astronomical viewing in most travel destinations, start looking at telescopes with an aperture of 3 inches or larger these will allow you to see objects up to 25 million light-years away with clear detail and color definition.
What kind of accessories should I consider when buying a travel telescope?
When shopping for a telescope for travel, look for models with accessories such as mounting plates, tripod adapters, dust caps, eyepiece holders, and carrying cases that can help protect your telescope during transit and storage. Also, consider purchasing additional eyepieces which may give you better performance under different conditions or when viewing different objects in space.
Can I use my laptop to control my travel telescope?
Many high-end telescopes now come equipped with computer software that allows you to control your device via wireless connection from your laptop or other electronic devices such as a mobile phone or tablet. This feature means you can easily adjust settings while on the move without having to manually adjust components each time you change location – ideal if traveling across multiple time zones.