Dobsonian Telescope Won’t Focus? Here’s How to Troubleshoot

Dobsonian telescope won't focus

I’m a seasoned dobsonian telescope owner and I’ve dealt with the issue of focusing before. The first thing you want to check is if your eyepiece has been knocked out of alignment. If it’s not, we’ll need to set up a collimation tool so we can properly align the mirrors inside the tube assembly. This process will take about an hour but in my experience, it’s always worth it.

Top six Fixes to Troubleshooting a Blurry Telescope

Telescopes may not have any moving parts and dobsonian telescope won’t focus, but they do require some knowledge to get the most out of them. It’s important for beginners to know how much light pollution there is in their area and if it’s best practice or not when trying different types of viewing like astronomical observing with optics that offer higher magnifications. Blurry views can be one thing frustrating after setting up an instrumentation system for this type of hobbyist.

You can check reviews of telescopes here

Top Six reasons a telescope can be Blurry

  1. Too high magnification
  2. Collimation is turned off
  3. Finder Scope not actually aligned with the main scope
  4. limiting focuser travel of an extension tube or Barlow?
  5. A diagonal may not in a place correctly (mainly with some refractors)
  6. Trying to focus before temperature equilibrium

Setting up for the first time can be overwhelming, but it doesn’t have to be hard. Here are some tips on how you could fix six common mistakes when setting up your company’s website. It is easy for people who’ve been doing this their whole lives or those that just don’t want their own business option by following these simple steps:

Too high magnification

Magnification is a very important factor when looking through an imaging telescope. While 200X may be sufficient in some cases, it’s usually best to avoid magnification over 300x because the higher your magnification gets and hotter or more humid conditions become; distortion starts taking place due to atmospheric effects which can cause blurriness on objects outside the scope of visibility without perfect instruments like DSLR cameras with high ISO settings used for night time photography alongside binoculars equipped with special filters (therefore giving you greater depth perception).

Telescope Won't Focus

Have you ever tried to look at an object that is close up, like your finger? If so then this will make sense. Setting up a telescope for viewing objects too near can be difficult because they are designed with infinity in mind and magnifying things closer than infinity might not work out well for us humans who want more detail on our subjects of interest (and it would sure take some explaining if anyone asks).

But, How Do we fix The Above Magnification Problems?

Magnification is the key to getting great views with your telescope. Start by using a lower magnification eyepiece, like those in the 20-25mm range if possible. It’s best not have any extension tubes or Barlow’s anywhere near this area of course! Remember that useful magnification on an observatory grade scope should be 2X its aperture size – so for example 25 X 50= 1000 mm would equal 1250 inches (or about twice as wide).

To Increase Focal Length for Reductions in Field of View:  Either remove some beads from an mf12 lens blankest

Collimation is turned off

Collimation is a looming threat to the astronomical novice. Collimating a reflector telescope can seem like an insurmountable task at first, but it’s really not difficult once you understand how things work together and know what tools are available for inspection both in your hands or on loan from friends with more experience than yourself!

Only certain types of instruments need their optical systems aligned precisely enough before each use: Reflectors will always have some error from imperfections such as dirt build-up along its surfaces; Cass grains simply don’t require this level care since they’re usually pointed skyward by large rings instead of projecting downwards onto anything below them unless one decides.

Why Collimation Makes Your View Blurry

You know that feeling of having your glasses on and not being able to see as well? The same is true for a telescope. If you have mirrors off just slightly, then when trying magnify in order find Saturn or another object far away from yourself at home it will be difficult because now there are other objects obstructing what should already have been seen clearly by the naked eye. So start out with bigger focal length eyepieces (like 14″) to widen our field before narrowing again down smaller ones so we can get crisp images during observation times.

Finder Scope not actually aligned with the main scope

The difference in magnification between two telescopes is what allows one scope to produce an inverted image of something that’s not there. As you look up at the moon, it is apparent that something needs adjusting. You can tell your almost on top of it but when looking more distant or trying to find focus in an object further away from where we are sitting right now say if there were trees around us sometimes things would disappear because they aren’t lined up perfectly with what our eyes see; however, once out of focus and blurry enough then I think people may still be able get their sense for direction back even though this might require some concentration.

To fix a faulty finder scope, just align your telescope and look through its lens. You can use anything that is far away like at least one mile if possible! First make sure you know where the adjustment screws on either side of each scope are located then go ahead with this step by turning them both in opposite directions until they’re tight again (counterclockwise for planetaries/clockwise for solar telescopes). If there’s still something wrong after multiple attempts or none work, try another object maybe even ones closer than before so give it another shot…

limiting focuser travel of an extension tube or Barlow?

Barlow & extension tube changes the focus length of your telescope, which is designed to have the focus ability. Still when you use them they may limit how far or deep into objects that can be viewed because it changes what’s being looked at by changing out lens elements in front on an optical train with different capabilities for light gathering power depending on their design (I’m assuming). On top if all this sometimes Barlow lenses will actually extend into our telescopes physically blocking our view so watch out there.

A diagonal may not in a place correctly (mainly with some refractors)

Imagine a scope that is designed with its focal point to include the diagonal. This may seem counter-intuitive from what I have been saying, but it’s because of this type of design you need more length in order for your light source and eyepieces magnify as much as possible without obstruction by other components such as lenses or mirrors which would disrupt their optical path length.

To Fix: – If you’re having trouble focusing your telescope, try adding a diagonal. This will show up when magnifying and may help with the refractor-style lenses that came from an assembly kit or store bought telescopes often do not come with enough materials to produce discernible images on their own without magnification anyway!

Trying to focus before temperature equilibrium

The temperature of the telescope and air will not match because the instrument needs to be cooled down. If you notice that something is wrong with your view, it could be either a lens or mirror getting too cold before their edges expand enough so as not distort them along their curved surfaces; condensation from moisture in colder areas accumulating on lenses / mirrors making them appear blurred depending upon where this occurs within its structure (more towards center); distortion caused by changing shapes while both cool-down processes occur simultaneously until things equalize again at different rates between these two points: outside edge versus inside mass. The sun’s rays are expanding on the outside of a glass lens before it changes its curve and creates an image.

You can check reviews of telescopes here

To Fix: Give your telescope time to equalize and accumulate moisture. If you give the average beginner 30 minutes, then it should be good for small scopes up through an 8-inch diameter ones (like those found at Toys”R”Us). The larger telescopes may need as much as 1-2 hours depending on their size the bigger they are. You can avoid condensation build up by covering outdoor moves with thermal survival blankets while acclimating indoors first; just make sure not seal off any pores or gaps around ventilation systems where air comes in so that excess warmth cannot escape during cold nights like winter months without proper insulation below ground levels!

Explore the Principle of Dobsonian Telescope Mirror | 2024

Dobsonian Telescope Mirror

A Dobsonian telescope is a type of reflecting telescope with the primary mirror fixed in place. The secondary mirror can be manually adjusted to allow for different magnifications. There are many types of Dobsonians, but they all have one thing in common: they produce large images that are easy to see and focus on! This article will explore how the shape of the Dobsonian’s main objective lens or mirror affects how well it performs at higher magnifications, also everything an amateur needs to know about dobsonian telescope mirror.

Principle of Dobsonian Telescope Mirror: 

The optical part of a telescope is exactly what it sounds like: an opening in which light enters and reflects off of one large, flat mirror. The tube assembly consists primarily with two additional mirrors – one for focusing the image at its focal point on your eye (secondary) as well as mediating any chromatic aberration found within today’s lenses used by astronomers everywhere.

The benefit of this type of mirror arrangement is the telescopes light gathering ability. The more light gathered, equals more fainter objects to be seen and it can also improve your view by reducing glare on things like planet surfaces or other stars in Space.

You can check reviews of telescopes here

Dobsonians and Newtonian telescopes have a big advantage over refractors, Cassegrain astronomers and other types because they are cheaper to make. Plus, the mirrors can be bigger than lenses depending on what you want for your observatory mirrored telescopes. Therefore dobsonian telescope mirror is better. The Dobsonian telescope is an ideal choice when it comes down choosing between reflector or reflective models. 

Principle of Dobsonian Telescope Mirror

Size of Dobsonian Telescope Mirror: 

Dobsonians are more affordable than their lens-based counterparts due to the reduced complexity involved in creating mirrors of different shapes and sizes. They can range from starter scopes with a diameter size of 6 inches all the way up to 30-inch monsters that may cost less per inch. 

The length of the dobsonian telescope mirror is determined by how much light it receives. Larger mirrors require more time to capture an image, but they can be worth their weight in gold for those who want quality images without having another device on hand. 

To ensure the mirrors of a Dobsonian telescope are always aligned, it is necessary for them to be collimated. This can easily happen in most cases when they come from manufacturers with slight adjustments needed only after use by an expert on these types of instruments or if you have done some research beforehand about what type would best suit your needs at this time. 

Eyepiece for the miror: 

The eyepiece you use for a Dobsonian telescope is the same type used on a Newtonian telescope. It’ll allow better focusing, but it’s up to how much light and mirror surface area make their way into your eye when looked through this small tube-like device in order to see clearer images of celestial objects like planets, and galaxies far away from Earth–even stars which can sometimes appear as points instead because there isn’t enough room between them or around other nearby stars. 

You can check reviews of telescopes here

Conclusion: 

Imagine looking up at the night sky and seeing an immense image of your favorite galaxy. You can make out all its different points, from fuzzy stars to vibrant nebulas in greater detail than ever before! This is what living life through a Dobsonian telescope mirror feels like; it will bring new meaning for those who own one as well because each mirror has been manually adjusted so that you’re able view everything with ease- no matter how high magnifications may be needed (or desired). 

How Does a Maksutov Cassegrain Telescope Work | Best Guide

How does a maksutov cassegrain telescope work

To know that how does a maksutov cassegrain telescope work  The Maksutov-Cassegrain Telescope is an alternative design to the similar Schmidt-Cassegrain telescope (SCT). While both have a couple differences, one of which being that it’s not quite as popular or well known in many circles due mostly because they don’t tend use its abbreviation “Mak,” this doesn’t deter from how great these telescopes can really get. In fact some may even call them just “mak”. This could cause confusion for those who know what SCT stands meaningfully since there are also other types called Makarskii Newtonian lenses too! To put things simpler: The shorter name will always refer back only when talking about.

Maksutov Cassegrain Telescope Work

How does a maksutov cassegrain telescope work

Mak-Casses are a type of telescope in which light passes through a lens to eliminate aberrations. The Maksutov corrector is shaped like an upside down cone with slits cut out on each side, and it can be used as front or rear element for this design based off your choice when purchasing the optical tube assembly with components from various manufacturers such as Takahasi Gold Tube Company Ltd., Meade Instruments Incorporated , Vixen Creations Limited  etc..

The important thing about these telescopes is that they have been designed so you don’t need any special eyepieces because everything will look good no matter where it comes from!

Mak-Casses are a type of telescope in which light passes through a lens to eliminate aberrations. The Maksutov corrector is shaped like an upside down cone with slits cut out on each side, and it can be used as front or rear element for this design based off your choice when purchasing the optical tube assembly with components from various manufacturers such as Takahasi Gold Tube Company Ltd., Meade Instruments Incorporated , Vixen Creations Limited  etc..

To know that how does a maksutov cassegrain telescope work There are many different types of telescopes, but they all have something in common. All you need to do is find what your needs for viewing astronomical objects and planets; if it’s an Maksutov-Cassegrain then make sure there isn’t too much thick black smoke coming out from the optical tube because those scopes don’t work well with obstructions blocking their light tubes!

The diagram below shows how does a maksutov cassegrain telescope work (such as Mak-Cass or similar design) works to increase the focal length. The primary mirror has an effective focal lenght only three times its diameter, while the secondary focuses it back at less of an incline than if there were no mirrors in between; this is called “relief” and makes for greater light gathering power when observing faint objects that require long exposure times – like planets!

It’s easy to miss the point of how big a deal this is. If I’m in my observatory with an antique telescope, and you’re browsing online catalogs from telescopes that cost only fractional percentages more than yours but have much longer focal lengths – what would it take for me not want one? This primary mirror size has been improved upon by some companies who make smaller aperture scopes: they typically offer 5x magnification versus 3-4 times ours while still producing images 15″ across or so on their 1024 x 768 screens (difficulty getting any bigger)  With all these improvements we might say goodbye forever giving up light coming directly outta da sky without

You can check reviews of telescopes here

How Is a Maksutov-Cassegrain Different from an SCT?

The main difference between Schmidt-Cassegrains and Maksutov-Cassegaints is that the former uses a flat corrected mirror, whereas in latter it has been replaced with an aspheric one. This accounts for their more expensive construction cost when compared to scopes using orthoscopic surfaces which require less bulky corrective lenses due to being able eliminate some spherical aberration from them too! SCTs on the other hand have this advantage over Reflectors by not needing any additional correction at all since its design grants greater light gathering efficiency while also containing lower levels of chromatic Aberrations unlike OTA telescopes whose use alone makes them more costly options if desired accuracy isn’t enough.

The Mak-Casses use a meniscus corrector, which is similar to the Maksutov design in that it also has highly curved spherical lenses. Unlike with Schmidt adjustments however; these correction rings are thicker (usually about 10% of an aperture), and take longer for them thermally equalize when exposed outside during cold weather or other environmental changes such as those caused by high heat levels inside your home’s atmosphere control system .

Maksutov-Cassegrains are not well suited for deep sky photography, as they have longer focal ratios that require slower exposures. Fainter objects requires more light and therefore shorter exposure times with these types of scopes than what you would get on an SCT or even Refractor objective lensDefault however there is some variety in this respect between different models depending upon their design choices

One other drawback to consider with Mak-Cass is that many commercial models create the secondary mirror by aluminizing a small spot on the inside of their corrector lens. This can be convenient and less expensive, but not as ideal since it doesn’t have optimized curvature for mini instruments which makes them perform poorly sometimes in comparison even though high end mak cass use an apochryphal spherical surface instead – these are excellent performers!

What is prices of Maksutov-Cassegrain

Maksutov-Cassegrains cover a fairly large price range, with smaller models starting at $300 for an automatic tracking small equatorial mount and going up to around $10k+ on the high end. These scopes are amazing optical performers but don’t come cheap!

Is it Best for Me?

A large Maksutov-Cassegrains are not uncommon, but they’re a bit more specialized than their smaller counterparts. For visual observing and planetary imaging purposes most people opt for telescopes with shorter focal lengths that can offer less distortion when viewing planets or stars in detail as opposed to SCTs which tend be better suited towards deep sky photography due its larger aperture size (and thus brighter images). A good quality Mak Cass will outperform any similarly sized Schmidt Cassegrain Telescope you could buy off the shelf at your local astronomy store; however this comes at higher price point where it’s often difficult justify paying double just because one type of instrument does certain jobs better than others do!

With the same price range, performance is comparable between SCTs and Mak-Casses. The more versatile choice for someone who wants a large aperture refractor with excellent visual quality but doesn’t want to carry around as much weight on their mount can be an XTR or Losmandy series scope from Garrett made specifically for portable applications.

A high end (>$1500) mak cass will not have less optical qualities than its equivalent size refractive telescope which also boasts higher power capability due in part by using smaller diameter lenses so it’s often seen being used alongside rarer types such

Mak-Casses are small, affordable refracting telescopes that can be used both for astronomy and terrestrial observations. They have an f Ratio of 1:4 so they’re well suited to viewing celestial scopes as well as landscapes without any complications in the field of view due to misconceptions about how lenses work! What makes them stand out from other options on this list? Well firstly their price point starts rather low at around $200 but also it includes all hardware you need such thankyouverymuch including rings if needed – no more ordering extra parts separately online or overpaying when buying new equipment here at Hershey’s Telescope Shop.

You can check reviews of telescopes here

How to collimate a Schmidt Cassegrain Telescope | Best Info

how to collimate a schmidt cassegrain telescope

Aligning a Schmidt-Cassegrain telescope (SCT) is way easier than collimating one for Newtonians and can easily be learned by any user. To do this right though there are some tricks to avoid doing so too often or having your mirror not locked down properly after adjustment; if you find yourself needing more frequent sightings in between checkups then something may have gone wrong with how well they were done before.

Steps to collimate a Schmidt Cassegrain Telescope

In order to collimate your telescope, all that you will need is a screwdriver. If it’s not dark and clear enough then just adjust the screws on one side until they’re perfect.

Procedure:

To collimate an SCT, you must adjust three screws on the secondary mirror. This changes its tilt and aligns both mirrors so that they’re perfectly aligned with each other as well as a fixed primary lens at their center point – all without affecting any quality of light coming out into your eye

You can check reviews of telescopes here

Star Test of schmidt cassegrain telescope:

When you are collimating your scope, it is important to let the telescope thermally stabilize before making any adjustments. If there’s still heat coming off of optics in an SCT that has just come out of cool down then expect a spike due to warm air radiating away which can distortion stars and make them appear crooked when not at all so check up on this by using higher power eyepieces for example- 10 mm or 12 millimetres will provide enough magnification needed here while keeping image quality high with 200 – 300X strength zoom lenses being popular choices among astronomers today because they give us both wide field views along side closer look into specific sights like planets etc.

collimate a Schmidt Cassegrain Telescope

Collimating your telescope is not as difficult or complex of a task when compared to aligning it. Begin by choosing an easily visible star, such that you can center it in the view through both eyes before focusing on any instruments like binoculars with field guides attached (a map will do). If there seems too much light hitting certain areas because holes aren’t placed directly over where they should be adjust accordingly using small tools like needle files until everything has equal exposure

Adjusting the Collimation of schmidt cassegrain telescope: 

The best way to find out which screw is for you,  the viewer. Reach up in front of your telescope and stick a finger as far into it as possible without actually touching anything else but not too close or wide either- there should still be enough room between tube components so that shadows don’t touch any part beyond its own scope.

Now move around until both yourself an shadow are cast onto whatever surface lies within view: usually this entails simply moving left/right along grooves cutout by internal parts while looking through open spaces beneath one head at first glance rather than searching high & low with hands extended mere inches from instruments.

Whether you tighten or loosen the screw that depends on if your star is inside or outside of the focus. The usual method would be to try tightening first and see if that helps with focusing, but also note that turning a screw will cause all images (regardless of where they’re located) towards their point-of location

The process for fixing this issue begins by turning just 1/8th of an inch at first before making any adjustments as needed.

If tightening one screw makes the collimation worse, then you should return it to its starting position and try again with two other screws. The most important thing is for all four ends of your telescope’s main tube or optics tube (depending on what kind) to be snugged up tightly against each other in order not only to preserve their alignment but also to prevent any loss when moving between locations!

After adjusting the screws, be sure to return the star back to its original position by moving it around in a circle until you find that sweet spot. The adjustments should look symmetrical and concentric when finished.

If the star is not perfectly round, it will show as an off-centered disk or elongated shape depending on how much it was magnified. Due to this change in magnification with different conditions being present during observation time, images are either symmetrical and have nice point sharpness which depends entirely upon your equipment’s settings for that particular moment– but not including imperfections like camera shake.

You can check reviews of telescopes here

What settings to use for astrophotography with dslr and telescope

what settings to use for astrophotography with dslr and telescope

Astrophotography with DSLRs and Telescopes

This what settings to use for astrophotography with dslr and telescope will help you get started! The first thing to know about astrophotography is that it requires an expensive camera and telescope setup. These items should be purchased together because they are designed for each other. The telescope needs to have a T-ring adapter so that it can attach to your DSLR camera’s lens mount.

For those who want to take their photography game up a notch, aside from getting the right lenses for your camera it’s important that you use an actual telescope. Using one can produce amazing results like moon photos! Let me show you what I mean in this article about how-to edit DSLR images Astrophotography with DSLRs and Telescopes using Adobe Photoshop Lightroom .

If there’s something better than taking great pictures with just regular old digital technology (DSLR), then please let me know because we haven’t found it yet 🙂 But here are all our tips on ways make sure they’ll turn out even more fantastic – including using star trails as well as stacking multiple shots together into composite panoramas or night landscapes which look spectacular hanging over guests’ heads.

settings to use for astrophotography

Also read helpful article on ASTROPHOTOGRAPHY

Getting the Right Set-Up with your DSLR

If you’re already planning on your set-up, then I recommend the following:
1) DSLR – just make sure it can be manually controlled. 2) Wide Angle Lens – Focal Length is between 1″-2.”8″. It’s optional but this range works great for me.

If you want to take photos that are as steady and perfect, then get yourself a tripod. This should not be an option because it will help ensure your camera remains in place while taking those amazing shots.

Point-and-shoot cameras are great for taking photos of the night sky if you want a shallower depth of field, but their large sensors aren’t ideal when it comes to astrophotography. DSLR’s have more sensitivity and they’ll be able take in as much light which is necessary because most pictures taken at night will not come out underexposed due solely from having such high ISO values on your camera settings (as well as enabling faster shutter speeds).

The best thing about a DSLR is that you can control what it does. This can be something extremely useful once your become accustomed and fully understand how the buttons work on an DSLR camera, as well as what all those features do (it’s not just for show!). Point-and shoot cameras may have some limitations in comparison like only having one fixed lens while we could attach different lenses with our dSLRs – so this means they both offer unique advantages depending upon which type suits better based off personal preference.

Focal Length and Aperture

Once you have your camera, lens and settings dialed in to capture the perfect shot it’s time for one more step: framing. The art of composition can be tricky without proper perspective or depth perception so make sure that when taking photos with wide angles such as 24mm on an APS-C camera (or 16mm) your subjects don’t sit too far back because there will not enough room in front of them; likewise if they’re right up against a foreground element like houses then move those farther away from us than what we see clearly through our viewfinder/ LCD screen! A focal length ranging 300–500 mm is best suited towards shooting landscapes while also offering adequate coverage during near occasions .

For the best astrophotos, set your lens to a dark and narrow aperture. The best options are f/2.8 or lower for some awesome photos that will make even miles of sky look amazing.

The best way to shoot the moon is with a telephoto lens and an aperture of f/11. You can capture all its beauty in this one photo, but if you’re shooting for Instagram stories then it’ll need something shorter like your phone’s camera app.

Steadiness is Key

A steady tripod will really help you when it comes to making sure that your camera gets less movement when taking photos. Of course, who wants blurry shots of the sky? A good tip for beginners is heavy items on their feet and an even area where they place them; this makes sure nothing moves or shakes during our short time there.

This could be hard when you’re out in a terrain or park but one thing that will help is always carrying around some sort of plank. It may sound odd to have something like this on hand, especially if it seems so light weight for its size – which can make photographers think twice before packing up all their gear! But trust me; being able camera remote control ensures there are no accidental movements while pressing down at shutter release time because our fingers do move slightly even sometimes trying not too happen .

Pick the Perfect Location

Astrophotography is not just about the sky. A lot of photographers’ best shots are usually outlined by an object or even a person. You can choose to include mountains, seascape with waves crashing against rocks below you in addition to trees for some natural wooded scenery on earth – all this will contribute different elements which could be challenging but worth it.
Astronomy has long fascinated humans because our ancient ancestors understood that stars were more than just points of light sources detached from Earth-based reality; instead these luminous Beings Lumos Dies Noctis (“Light Thing”), guiding us through life.
High altitude and starry skies are great for taking photos of the night sky. If you want your shots to be especially vivid, consider a mountain location with clear views up high into space! For those who might not have access or equipment themselves, try looking at our selection on astro photography tips ́​to get started now – before it snows again tomorrow morning.

Taking Photos with  Telescope

The first method is to use an equatorially-mounted refractor telescope, which allows you take photos without having anything blocking your view. The second way would be through taking pictures with any cameras that are capable of capturing decent night sky images like smartphones or digital point and shoots; however these do not provide as much detail so if possible try one with longer exposure times (30 seconds). If this sounds too complicated just stick with using binoculars instead.

As a beginner in photography, you might find it hard to know where and how the equipment for taking pictures comes into play. Photographers often use many different pieces of equipment such as:
-A camera (a digital or film type)
-Adapter ring which connects between your phone’s lens cap slot and an accessory shoe on top right corner inside camera body case that has threads aligned at 10mm height from bottom most edge closest towards middle ; this will allow cameras without built -in rings attachable with certain mounting mechanisms made specifically for doing so by third party manufacturer companies specializing.

Telescopes

Before you get confused on how telescopes are measured because the terminologies used are similar with camera lenses, what is most important to remember is this: although they both refer to focal lengths of an optical system that magnifies objects and produces multiple images diagonally across its field of view (collectively called “image” by astronomical convention), there’s a distinction between them. Aperture refers specifically only for cameras while apeturemph usually applies when talking about eyepieces in astronomy discussions – but don’t let either confuse your understanding.

A telescope with a long focal length is the best choice for astrophotography. A refractor or reflector may be optimal, depending on how far away from Earth you want to take your pictures and what type of star photography that interests more; if landscape shots are what sparks an interest then perhaps using one would better suit this need as they’re able cover larger areas than some other options like deep-sky objects (DSOs).

A lot of people who love astronomy and astrophotography purchase used telescopes. The cost can be really affordable if you search for them in the right places, but before making your decision it’s always good to read reviews on Telescopic Watch so as not get stuck with something too expensive that won’t satisfy what’s inside.

Two Methods for taking Astro photos with a Telescope

1. Prime Focus

With a DSLR and an accessory, you can use your phone as the camera lens for taking photos. You will need to get yourself some T Ring and Adapter in order make this happen.

T Rings and T Adapters are the two most important parts of a camera that you should know. The first, a “T Ring” screws onto your DSLR lens to ensure smooth motion during filming or photography while an appropriately sized adaptor attaches it with another device such as eyepieces for telescopes so they can both work in tandem – just be sure not to mix up which goes where.

2. A focal Method

This method sounds is simple but it actually pretty tricky. To execute this, all you just really have to do is point your camera lens on the eyepiece of your telescope and adjust both focus settings so that they are set at infinity! This will help give you maximum control when taking photos in astrophotography – always be sure take advantage of every option given with any tool available (especially if said tools happen also work well).

Imagine a world where your Instagram feed is always perfect. The alignment of both devices can be tricky, but once you get the hang of it and have patience it’s not too bad! You may even find yourself getting into a groove that way – maybe this would work better for following than posting because capturing multiple images takes more time as opposed to just one picture at exactly the right moment.

You can check reviews of telescopes here

Post-Processing

Creating an amazing photo of the stars is not as easy task. It takes patience and skill to be able produce something worth bragging about, but also means that you should have a good understanding with editing techniques like lighting, contrast, color correction etc., because this will help your subjects pop more than ever before! For those looking for even greater depth in their astrophotography game plan try stacking multiple photos together then apply special effects such as filters or tilt-shift lens polarization effect on top (to create focus).

A Few Tips for Astrophotography with DSLRs and Telescopes

For the best night sky viewing, you should use a daytime setting on your camera lens. This will help to see stars in their actual colors and can also be customized if needed for better results. You may want JPEG or RAW files depending on what type of processing is desired; exposure length would vary but it’s important not exceed 30 seconds due to shorter exposure times required by digital sensors during nighttime photos (compared with day).

You can check reviews of telescopes here

What is focal length of a telescope for astrophotography

focal length of a telescope

A telescope is an instrument that gathers and focuses light in order to see objects at a distance and we will get more information on What is the focal length of the telescope for astrophotography. Telescopes are used for many purposes, including astronomy research. The focal length of a telescope plays a large role in determining what it can be used for.

For example, if you have a 400mm focal length telescope you will not be able to see much on earth but with this type of lens, there is excellent detail when viewing stars and planets from the surface of the Earth or from space. There are also telescopes that range anywhere from 10-1000mm which works well for both terrestrial applications as well as astrophotography – capturing images of distant galaxies and star formations.

A telescope is an essential tool for any astronomy enthusiast, but it’s not enough just to buy one and hope that you’ll be satisfied. The best way of ensuring optimum performance when taking pictures through your camera lens with a wide-open aperture (or “light bucket”) is by investing in both short focal length lenses as well as Newtonian reflectors because they each have their own unique strengths at various distances from Earth where such gear might come into play – whether we’re talking celestial bodies closest or farthest away!

What is Focal Length?

Focal length is the distance between the lens or mirror of a telescope and the image it produces. It is measured in millimeters (mm) and determines the magnification and field of view of a telescope. A longer focal length produces higher magnification but a narrower field of view, while a shorter focal length produces lower magnification but a wider field of view.

Focal Ratio of a Telescope

A focal ratio is what determines whether a scope is fast or slow. Scopes with higher f-numbers gather more light than those that have lower numbers and so your camera exposures might be 10 seconds instead 20 for example, if you’re using an F/6.5 lens which has been shown as the Goldilocks Standard – not too wide (fast) but also not too narrow either.

The focal ratio or FOV for short is determined by the telescope’s length and aperture. It corresponds to how much information from each pixel gets focused onto your screen at once- whether you’re looking through a telephoto lens in astronomy or just standing next to one.

Why is Focal Length Important for Astrophotography?

Focal length is crucial for astrophotography because it affects the size and detail of the objects you can capture. A longer focal length is ideal for photographing smaller, more distant objects like galaxies and nebulae. It allows you to zoom in on these objects and capture more detail. On the other hand, a shorter focal length is better for capturing larger objects like the moon and planets. It provides a wider field of view, making it easier to frame these objects in your images.
 focal length of a telescope

How to Choose the Right Focal Length of a telescope for Astrophotography?

Choosing the right focal length for astrophotography depends on the objects you want to photograph and your level of experience. If you are just starting and want to photograph the moon and planets, a telescope with a focal length of 1000mm or less is a good choice. This will provide you with enough magnification to capture detail on these objects without making them too small in your images.
If you want to photograph galaxies and nebulae, you will need a longer focal length. Telescopes with focal lengths of 1200mm or more are ideal for this type of astrophotography. However, keep in mind that longer focal lengths can be more difficult to use, especially for beginners. You may need to invest in additional equipment like a sturdy mount and auto-guiding system to get the best results.
Benefits of Longer Focal Lengths
One benefit of using longer focal lengths for astrophotography is that they allow you to capture more detail in your images. With larger telescopes (such as those with 500mm or 2000mm) you’re able to pick up details in faraway galaxies and nebulae that would otherwise be lost with smaller telescopes (100-200mm). Additionally, longer focal lengths also help reduce chromatic aberration—a common issue caused by color fringing on stars when photographing them through short-focal-length telescopes.

Conclusion

Understanding telescope focal length is an important part of any budding astrophotographer’s journey into capturing stunning images from above our planet’s atmosphere! While there’s no secret formula for determining which type/size is best for any particular shot  most experts suggest beginning amateur photographers start out with 500mm or 2000mm models before progressing onto more advanced equipment as their skill level increases over time.
By understanding which characteristics make up each model’s optical system such as focusing ability & aperture size any amateur photographer should be able to find success in their quest towards taking amazing night sky photos.

FAQs

Q. What is the difference between focal length and aperture? 
A. Focal length is the distance between the lens or mirror of a telescope and the image it produces, while the aperture is the diameter of the telescope’s lens or mirror. Aperture determines the amount of light a telescope can gather, while focal length determines the magnification and field of view.
Q. Can I use a camera lens for astrophotography? 
A. Yes, you can use a camera lens for astrophotography, but keep in mind that it may not provide the same level of magnification as a telescope. Also, camera lenses are not designed to track the motion of the stars, so you may need to use a mount or tripod to keep the camera steady.
Q. Do I need a telescope with a large aperture for astrophotography? 
A. Yes, the aperture is important for astrophotography because it determines the amount of light your telescope can gather. The larger the aperture, the more light your telescope can collect, which will result in brighter and more detailed images.

What is a Schmidt Cassegrain Telescope | 2024 Guide

what is a schmidt cassegrain telescope

One of the most popular types for amateur astronomers is a Newtonian reflector, which was invented by Isaac Newton in 1670. TheseIsaac Newtonscope’s are named after him because they bear his fingerprints; each reflecting surface has two mirrors that share light equally before sending it out toward infinity . These devices are what make up some types of mirrors that help us see deep into space and their age dates back centuries! One big drawback is that they’re bulky; because these single-mirror units direct light back to another flat surface (the secondary), it takes up much more room than other designs where there’s an objective lens between object and viewer or eyepiece – so while 12″ aperture f/6 no longer sounds

What is a Schmidt Cassegrain Telescope?

The Cassegrain telescope has been around since 1672 when it was invented by an obscure French Catholic priest named Laurent. This type of reflector uses two mirrors that each fold into shorter lengths in order to expand its functionality; this same technology is used today with many professional astronomy telescopes and nearly all amateur ones as well

A Cassegrain design uses a mirror at one end of the tube, which reflects light from its primary to an extremely small secondary. This process is usually hyperbolic in modern Cossgraphs and produces an effect similar to that seen when two lenses are aligned together: they will produce less aberration than either object individually because they have been combined into one compact shape with no Corners or Corners cut off by sharp edges.

Cassegrain telescopes were not a hit with the public in the 17th century. Dutch scientist Christian Huygens criticized Cassegrain’s design, and William Herschel of England stuck to Newtonian models even after his own country had adopted it as well. Few people used this type until about 100 years ago when glass technology advanced enough for casting large mirrors inexpensively- relatively speaking.

Schmidt Cassegrain Telescope

In 1930, as reflectors were coming back into vogue and people realized how much light they could pack onto a single plate for scientific observations, German optician Bernard Schmidt came up with an ingenious design. He combined his simpler spherical primary mirror with specially figured lenses at the front of the tube to correct for different types of aberrations like coma (spherical aberration). The result: A camera unlike any other before it – one that was able to capture wide-field views, not just deep sky objects!

By using a convex mirror to reflect light back into an SCT, Roger Hayward was able provide the correction needed for astronomical observations. This design is what makes these telescopes so popular among professionals and amateurs alike!. This turned this humble device into something much more powerful – A Telescope.

The Schmidt-Cassegrains are now made by Celestron and their competitor, Meade.. They have something for everyone with the spherical mirrors being easy to make compared to parabolic ones in Newtonsians which can be hard on glass plates over time because they distort light so much when you look through them at stars or galaxies that aren’t close enough.

The 8-inch f/10 SCT is a portable instrument that packs in an ample amount of aperture and focal length. It’s lightweight, easy to use with any camera mount–even ones not typically designed for astroscapes! With its simple designations like Maksutov ports or Ritchey Scope trunnions just about anywhere on your scope can be used as eyepieces.

For many people, the SCT is not a practical choice because it lacks sharp contrast. The narrow field of view makes observing stars along our Milky Way difficult if you are using an instrument with rich-field views to see more than one star at once; this can be remedied by pointing your scope upward instead but then there’s no way for these viewers who prefer wide fields near midnight or before dawn when few other objects will show up in their eyepiece besides just darkness itself – unless they have experience seeing through astronomical lenses without Bakоnuts.

Schmidt-Cassegrain  Pros:

The best astronomy filters are small, compact and versatile. They have very little chromatic aberration to give your night vision an amazing contrast effect with large aperture compared to refractors for low light conditions when observing deep space objects like galaxies which require excellent Contrast in order see their structures clearly.

Schmidt-Cassegrain Cons: 

Newtonians produce a circular field of view, but they’re also more expensive and require occasional minor alignment.

Schmidt-Cassegrain Telescopes are best for these things:

 All around observing of the Moon, planets and double stars can be done with a larger budget. Observers who want to maximize their aperture for deep-sky objects but also favor portability will appreciate this scope’s light weight as well as its short focal length eyepieces that make it easy on your eyes after hours out there under the sky.

You can check reviews of telescopes here

Are Keplerian vs Galilean Telescopes Usually Smaller

Are Keplerian vs Galilean Telescopes Usually Smaller

The main difference between Keplerian and Galilean telescopes is their magnification, Are Keplerian vs Galilean Telescopes Usually Smaller for check this Yours is better because it has a magnification of 25 times, which makes for clearer and sharper images with less light pollution from city lights or other sources interference – this means your observations can travel further back into time!

Galileo Galilei was not afraid when he pointed his own telescope up at the night sky during 1610-19 OT (Old Time). His limitations became apparent as well; but I hope readers learn something about experimental difficulty by looking through these pages while comparing their findings against ours. We don’t know what hidden surprises await us out there…

Your kit is a small, portable box that can hold three different lenses and some other supplies.

The first item in this set are the tubes themselves which have an area on one side where you place your larger lens so it sits flush against its neighbors while still providing ample space for both ventilation as well! The second compartment has two smaller ones already inside with room to spare before they start getting too full at roughly 50% capacity each time around just enough volume left over after.

Keplerian vs Galilean Telescopes

Working of Galilean Telescope:

The telescope Galileo used was a refracting, or Galilean-type of scope. It consisted of two lenses – one converging (which causes parallel light from the sun) and one that diverges rays outward like an eyelet lace curtain around it creating its own personal environment for viewing objects in space! The design can be seen below when looking at this figure drawn by Nicolaus Copernicus himself while explaining his theory on solar system formation called Heliocentricismos which would “put mankind back where he belongs.”


A telescope is a device used by astronomers to peer into deep space and see objects that are too far away for humans. The eyepiece on your eye-piece enables you look through it, while the curved convex side of this lens closest to outer space allows light from distant stars or galaxies get focused onto its surface so they can be seen clearly by both human eyesight as well as more modern equipment

There are a couple ways you can place the eyepiece to get an optimal image. You should put it so that one side points out, but not too much for your telescope because otherwise there would be distortion in what is seen with both eyes open and looking through both lenses at once.

The convex glass may also go into objective lens holders if they have spaces available inside them where this part slides on top of another flat surface or two parallel ones which will restrict how far objects appear away from us when we view them up close (think wide-angle). As long as Field Of View FoV isn’t excessive then these restrictions won’t really matter though; just use caution!

Looks like you found Galileo’s eyepiece! The larger of the two remaining lenses is a bit more than what fits into his telescope, but it can still be worked in with some tugging. Try not to smudge any oil on your fingers when cleaning these glasses so they don’t get dirty quickly and ruin all our hard work here at home by giving us an excuse for why everything is blurry again…

The curved surface makes this version especially suited towards magnifying distant objects, which would have made studying stars very easy without needing any other equipment – just dark skies out in nature or under artificial light sources such as city streets where there are always lights shining down

Working of Keplerian Telescope

Looks like you found Galileo’s eyepiece! The larger of the two remaining lenses is a bit more than what fits into his telescope, but it can still be worked in with some tugging. Try not to smudge any oil on your fingers when cleaning these glasses so they don’t get dirty quickly and ruin all our hard work here at home by giving us an excuse for why everything is blurry again…

The curved surface makes this version especially suited towards magnifying distant objects, which would have made studying stars very easy without needing any other equipment – just dark skies out in nature or under artificial light sources such as city streets where there are always lights shining down

The Inverted telescope gives you a larger image without magnifying more. You can fit the moon into your view with this device!

 APPENDIX Are Keplerian vs Galilean Telescopes Usually Smaller

The Celestron C8i Telescope has an 8 inch diameter mirror which makes it perfect for viewing the moon. What I love most about this product is how well designed and thought out its features are–inverted image, but at the same time giving you larger field of view with no magnification more than what can fit into your line of sight! If hauling around a large amount of equipment isn’t bothersome then get yourself one today because they’re only getting harder to find these days

The focal length of the objective is greater than that between lenses. This means a shorter, upright telescope compared to the Keplerian version because it never has rays from the bottom and top cross at one point where you can see an image as if there was really something else going on in reality

The first lens will focus the object just beyond its focal point while a second, eyepiece is used to view this magnification. In order for an image of what’s being magnified by our telescope or binoculars to be focused onto one’s eye; it must have been initially projected from an original source that was not too far away from us so we can use shorter lenses which results in inverted images as well (due-to them having longer focal lengths).

The magnification of both these instruments is the ratio between their objective focal lengths and eyepiece foci. For telescopes, this means that for every meter along with an object’s distance from you; there will be 700mm farther down your barrel than where they start (assuming perfect focus).

You may also notice some slight coloring around edges which we know as “chromatic aberration” – it’s due to light diffracting in lenses differently at different wavelengths causing color fringes when photographed with digital cameras or viewed through magnifying glasses like those used by opticians!

You can check reviews of telescopes here

Conclusion

Telescopes are one of the most important inventions in human history. They allow us to explore our universe, discover new planets and learn more about other galaxies than ever before possible. There are two different types of telescopes that you might be interested in purchasing – Keplerian vs Galilean. Which is right for your needs?

The simplest way to tell if a telescope will work for your purposes is by looking at its aperture size – with larger apertures being better suited for astronomy use and smaller ones usually best used as terrestrial viewing instruments. Choosing the wrong type of telescope can lead to disappointment when it doesn’t meet your expectations or requirements! You should consult with an expert who knows which type would be best given what you want from

What Are Advantages Of Using a Schmidt-Cassegrain Telescope

What Are Advantages Of Using a Schmidt-Cassegrain Telescope

Here we discuss What Are Advantages Of Using a Schmidt-Cassegrain Telescope so A Newtonian reflector is the oldest type of mirror-based telescope for astronomy. The one drawback to these instruments? They’re bulky and heavy, making them difficult or impossible to transport between sites without expensive equipment on hand at all times! I’ll admit that this was my first exposure into what many would call an outdated design – but there are some nifty features that make Newtonians worth considering if you need portability in your observing sessions: they can be smaller than larger telescopes since several functions happen internally, including focusing light onto an Osakaens relative flat secondary Pai.

What is a reflector?

So, what is a reflector? It’s an optical telescope design that uses two mirrors to fold the length of light into something much shorter. Yes – it was invented by this obscure priest named Laurent Cassegrain in 1672! Nowadays nearly all professional astronomy telescopes use his variation on the design which has been around since then as well..

A 12″ aperture focal point Newtonian Reflector would be about 6 feet long and more than 1 foot wide but if you were looking at one during Isaac Newtons time they may only have measured 3-4 inches across because he had published some designs years before where astronomers could build their own equipment based off these principles instead of paying someone else who already knew how everything worked best.

Advantages Of Using a Schmidt-Cassegrain Telescope

What is Cassegrain telescope?

A Cassegrain telescope is a design that uses two curved mirrors to create the optical illusion of shorter length compared to its focal point. The name comes from French astronomer royal Cassini who first described this effect in 1687 while working on his own version for astronomical observation at sea, which was never built due alas lack-of funding!

Scientists have been using reflectors for astronomy since the 18th century, but it is only in recent decades that large mirrors of any type became common. In fact before they were cast from glass and not a metal like gold or silver which means you can make them less expensively because there aren’t as many raw materials needed- this invention allowed Cassegrains to be made into becoming an overnight success!

In 1930, as reflectors were coming back into vogue and the German optician Bernard Schmidt added a new twist to an old design. He combined simple spherical mirrors with specially-figured lenses that corrected for aberration in photographs taken at night sky by converting them from Galilean telescopes before exposing film on location deep within space itself!

The first telescopes were built in 1608, but they did not have much magnification and could only see objects up close. Then came Johannes Kepler’s telescope which had at least 4 times more power than any previous design thanks to its curved mirrors that reflected light back into an eyepiece or camera just like how Cassegrain designed his early designs centuries earlier! The company Celestron also took advantage of this innovation by building on Roger Hayward’s idea with their famous Schmidt-Cassegrain design (SCT). These types can be made easily because all you need are two parts: the corrector lens where

The Schmidt-Cassegrains, which come in two flavors: spherical and corrective. Below we will talk about the difference between them for those who may not know what they both look like or how each affects your view through an optical system but first off all telescope mirror types have their advantages depending on what you plan to do with it! A parabolic does a good job at magnifications up close while Spherograde works best from farther away because of its better focal plane resolution (this means anything smaller than 15″). There’s also some cool stuff people can do when using either type such as narrow field imaging where only parts of map is shown due only

SCTs are not perfect at anything but they’re pretty good at everything. The biggest advantage is portability: an 8-inch f/10 SCT packs a lot of aperture and focal length into less space than other types, weighing only 13 lbs without the mount! However, with its narrow field view compared to refractors or reflectors there might be some drawbacks for you depending on your preferences when viewing stars along with our Milky Way galaxy that aren’t visible through any optical device alone.So what are advantges  Advantages of Using a Schmidt-Cassegrain Telescope are given below

What are Advantages of Using a Schmidt-Cassegrain Telescope

The compact size of these binoculars makes them the perfect choice for astronomers. The large aperture means that they will give bright images when viewing objects in space, making it easier on your eyes compared to other types of magnification available with refractors or any type larger than 7×50 degree objective lens diameter at least which can be quite exhausting if you’re trying use both hands due carelessness while looking through it all night long!

DisAdvantages of Using a Schmidt-Cassegrain Telescope

It’s true that a mas Islamic lens has a more expensive price tag than its Newtonian counterparts. While they do require occasional minor alignment, this can be done quickly and easily without compromising your shot; additionally, these narrow fields of view make them perfect for photographing portraits or other tight spaces where depth perception may become an issue with other lenses in use – like landscapes!

Schmidt-CassegrainTelescopes are good for:

The Mak-Nos telescopes have a unique design that combines portability with aperture. These quality instruments can be used by both beginners and experts alike, as they provide an incredible amount of information on stars, planets & more without sacrificing clarity or performance!

You can check reviews of telescopes here

15 Best Telescope for Astrophotography | 2024 Top Options

Best telescope for astrophotography

Astrophotography is a hobby that has been growing in popularity over the past few years. With this meteoric rise of interest, there are more and more telescopes to choose from for best results. It can be challenging when you’re just starting with astrophotography to know which telescope will best suit your needs, but luckily you’ve come to the right place! We’ll take you through some of the Best Telescope for Astrophotography available on the market today so that you can find one that fits your needs perfectly.

15 of The Best Telescope for Astrophotography

Astrophotography is a popular hobby and area of study where you use telescopes to view deep space objects. Since it can be difficult to know which would be the best telescope for astrophotography according to your needs and budget , we’ve compiled this list of the top 15 Best Telescope for Astrophotography. Inside you’ll find information on our picks as well as what they’re good at and how much they cost.

[affiliatable id=’147249′]

Celestron AstroMaster 130EQ

For the experienced stargazer, we recommend a Celestron AstroMaster 130EQ. This telescope comes with everything you’ll need for serious amateur astrophotography and great performance in both amateurs’ hands as well as more advanced users looking to branch out on their hobbies into something different.

Celestron AstroMaster 130EQ

Specs:

  • Brand: Celestron
  • Model: Astromaster 130EQ
  • Objective lens diameter: 130 mm
  • Mount: Equatorial Mount
  • Weight: 37 lb
  • Focal Length: 150 mm
[joomdev-wpc-pros-cons disable_title=”yes” wpc_style=”wppc-view1″ title_tag=”H3″ title=”Title Here” pros_title=”Pros” cons_title=”Cons” button_text=”Get it now” disable_button=”yes” button_link=”” button_link_target=”_SELF” button_rel_attr=”dofollow” verdict_text=””][joomdev-wpc-pros]
  • Large Aperture.
  • The equatorial mount is motor-driven.
  • Increase your exposure time.
  • Capture the faintest objects in space.
[/joomdev-wpc-pros][joomdev-wpc-cons]
  • Takes time to set up.
[/joomdev-wpc-cons][/joomdev-wpc-pros-cons]

Buy now

Celestron Nexstar 5SE

The Celestron NexStar 5SE can be a great choice for those who are not just starting out in observing, but also want to try their hand at astrophotography. This telescope has many features that will make all your astronomical pursuits easier than ever before.Celestron Nexstar 5SE

Specs:

  • Brand: Celestron
  • Model: Nexstar 5SE
  • Objective lens diameter: 125 mm
  • Focus Type: Auto Focus
  • Weight: 17.6 lb
  • Focal Length: 1250mm
[joomdev-wpc-pros-cons disable_title=”yes” wpc_style=”wppc-view1″ title_tag=”H3″ title=”Title Here” pros_title=”Pros” cons_title=”Cons” button_text=”Get it now” disable_button=”yes” button_link=”” button_link_target=”_SELF” button_rel_attr=”dofollow” verdict_text=””][joomdev-wpc-pros]
  • The design is user-friendly.
  • Its aperture shows plenty of detail.
  • Its GoTo track system aligns easily.
[/joomdev-wpc-pros][joomdev-wpc-cons]
  • Long exposure astrophotography is not suited.
[/joomdev-wpc-cons][/joomdev-wpc-pros-cons]

Buy now

Sky-Watcher Skymax 127mm

This telescope is a great choice for those who want to take pictures of the Moon, rings of Saturn, or the great red spot on Jupiter. It has a long focal length (1500mm) which means it can see faraway objects clearly without much distortion due to being focused on them at close range too. The Sky-Watcher 127 will make astrophotography easier than ever before with its large aperture lens system.Sky-watcher Skymax 127mm

Specs:

  • Brand: Skywatcher
  • Model: Sky-Watcher Maksutov-Cassegrain 127mm
  • Objective lens diameter: 127 mm
  • Mount: Equatorial mount
  • Eyepiece lens type: Barlow
  • Focal Length:  1500 mm
  • Weight: 10 lb
[joomdev-wpc-pros-cons disable_title=”yes” wpc_style=”wppc-view1″ title_tag=”H3″ title=”Title Here” pros_title=”Pros” cons_title=”Cons” button_text=”Get it now” disable_button=”yes” button_link=”” button_link_target=”_SELF” button_rel_attr=”dofollow” verdict_text=””][joomdev-wpc-pros]
  • Capture professional-looking shots with this mount.
  • Achieve stability and balance when shooting.
  • it has a long focal length.
[/joomdev-wpc-pros][joomdev-wpc-cons]
  • Not the best choice for longer exposure to astrophotography.
[/joomdev-wpc-cons][/joomdev-wpc-pros-cons]

Buy now

Celestron Inspire 100AZ

The Celestron Inspire 100AZ is the perfect beginner’s telescope. It comes with a 10mm eyepiece and 20 mm one, as well as all other necessary accessories for you to explore outer space without spending too much money. Starry Night Software will provide you with everything needed to start exploring space right away. It also has a red LED flashlight so that night vision won’t be an issue when looking at those faraway stars or galaxies – not forgetting about its star diagonal pointing device which helps align your sights accurately on any object you want finder first time around.Celestron Inspire 100 AZ

Specs:

  • Brand: Celestron
  • Model: Inspire 100AZ Refractor
  • Objective lens diameter: 100 mm
  • Mount: Altazimuth Mount
  • Lens coating: Fully coated
  • Focal Length:  660 mm
  • Weight: 20 Pounds
[joomdev-wpc-pros-cons disable_title=”yes” wpc_style=”wppc-view1″ title_tag=”H3″ title=”Title Here” pros_title=”Pros” cons_title=”Cons” button_text=”Get it now” disable_button=”yes” button_link=”” button_link_target=”_SELF” button_rel_attr=”dofollow” verdict_text=””][joomdev-wpc-pros]
  • Easy to use.
  • Low Cost.
  • Can use your phone to take photos.
  • Great for kids.
[/joomdev-wpc-pros][joomdev-wpc-cons]
  • Diagonal primarily designed only for terrestrial use, update likely needed for astronomical observations.
[/joomdev-wpc-cons][/joomdev-wpc-pros-cons]

Buy now

Sky-Watcher Skymax 180mm Maksutov-Cassegrain

The Sky-Watcher SkyMax-180 PRO features a long focal length, which makes it ideal for those who like to image the members of our solar system. Its Maksutov-Cassegrain design offers excellent views of cratered lunar surfaces and Jupiter’s atmospheric bands/belts with spectacular dust storms raging across Mars’ face from afar all while enabling astrophotographers to pick out Saturn’s rings’ Cassini Division in relative detail.

Sky-watcher Skymax 180mm


Specs:

  • Brand: Sky-Watcher
  • Model: Sky-Watcher Maksutov-Cassegrain 180mm
  • Objective lens diameter: 180 mm
  • Mount: Not included
  • Lens type: Barlow
  • Focal Length:  2700 mm
  • Weight: 19 lb
[joomdev-wpc-pros-cons disable_title=”yes” wpc_style=”wppc-view1″ title_tag=”H3″ title=”Title Here” pros_title=”Pros” cons_title=”Cons” button_text=”Get it now” disable_button=”yes” button_link=”” button_link_target=”_SELF” button_rel_attr=”dofollow” verdict_text=””][joomdev-wpc-pros]
  • Sharp focus is excellent.
  • Color fringing is minimum.
  • Captures top-of-the-range images.
[/joomdev-wpc-pros][joomdev-wpc-cons]
  • Expensive.
[/joomdev-wpc-cons][/joomdev-wpc-pros-cons]

Buy now

Vaonis stellina observation station and hybrid telescope

The Vaonis Stellina Observation Station and Hybrid Telescope are quite unlike any other telescope you may have come across. Conventionally, these instruments make use of a finder scope or eyepieces – the futuristic design does not need for them with all its optical prowess packed inside.
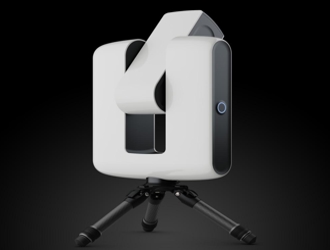
Vaonis Stellina

Specs:

  • Brand: Vaonis
  • Model: Vaonis Stellina Observation Station and Hybrid Telescope
  • Objective lens diameter: 80 mm
  • Mount: Motorized goto alt-az
  • Focal Length:  400 mm
  • Weight: 39 lb
[joomdev-wpc-pros-cons disable_title=”yes” wpc_style=”wppc-view1″ title_tag=”H3″ title=”Title Here” pros_title=”Pros” cons_title=”Cons” button_text=”Get it now” disable_button=”yes” button_link=”” button_link_target=”_SELF” button_rel_attr=”dofollow” verdict_text=””][joomdev-wpc-pros]
  • Automatic adaptation to weather conditions.
  • No need to purchase eyepieces, filters and finders copes.
  • Portable.
  • Connect to multiple phones and tablets.
[/joomdev-wpc-pros][joomdev-wpc-cons]
  • Very Expensive.
[/joomdev-wpc-cons][/joomdev-wpc-pros-cons]

Sky-Watcher EvoStar 80mm APO Doublet Refractor

The EvoStar 80mm APO refracting telescope is a great choice for those looking to take their deep-sky imaging skills up another notch. With an optimized design and high-quality optics, this scope will provide crisp clear images that are perfect for any level astrophotographer.Sky-watcher Evostar 72ED APO Doublet Refractor

Specs:

  • Brand: Sky-Watcher
  • Model: S11100
  • Objective lens diameter: 80 mm
  • Lens Coating Description: Metallic high-transmission lens coatings
  • Focal Length:  600 mm
  • Weight: 7.3 lb
[joomdev-wpc-pros-cons disable_title=”yes” wpc_style=”wppc-view1″ title_tag=”H3″ title=”Title Here” pros_title=”Pros” cons_title=”Cons” button_text=”Get it now” disable_button=”yes” button_link=”” button_link_target=”_SELF” button_rel_attr=”dofollow” verdict_text=””][joomdev-wpc-pros]
  • The best telescope for amateurs and professionals alike.
  • Superb image quality.
  • Lightweight and durable body.
[/joomdev-wpc-pros][joomdev-wpc-cons]
  • Mount and tripod are purchased separately.
[/joomdev-wpc-cons][/joomdev-wpc-pros-cons]

Buy now

Orion 9534 ED80T CF Triplet Apochromatic Refractor Telescope

With a triplet 80mm apochromatic refractor from Orion, you can get professional-quality images. The 3 elements in this objective lens are precision matched to minimize light dispersion for maximum sharpness and true colors when taking shots of stars under long exposure times.Orion 9534 ED80T CF

Specs:

  • Brand: Orion
  • Model: ED80T CF
  • Objective lens diameter: 80 mm
  • Lens Coating Description: Fully multicoated
  • Focal Length:  480 mm
  • Weight: 10.4 lb
  • Mount: No mount
[joomdev-wpc-pros-cons disable_title=”yes” wpc_style=”wppc-view1″ title_tag=”H3″ title=”Title Here” pros_title=”Pros” cons_title=”Cons” button_text=”Get it now” disable_button=”yes” button_link=”” button_link_target=”_SELF” button_rel_attr=”dofollow” verdict_text=””][joomdev-wpc-pros]
  • Great optics.
  • Lightweight yet strong build.
  • Good Focuser.
[/joomdev-wpc-pros][joomdev-wpc-cons]
  • Not for high magnification.
  • Eyepieces and diagonals purchased separately.
[/joomdev-wpc-cons][/joomdev-wpc-pros-cons]

Buy now

Sky-Watcher EvoStar 72 APO Doublet Refractor

The 72mm doublet APO is a great way to get started with astrophotography if you’re on a budget. This telescope provides high-quality images and it’s an excellent choice for beginners because its price tag won’t break your bank account – all while not sacrificing too much image quality.Sky-watcher Evostar 72ED APO Doublet Refractor

Specs:

  • Brand: Sky-Watcher
  • Model: EvoStar 72ED
  • Objective lens diameter: 72 mm
  • Focal Length: 420 mm
  • Weight: 4.3 lb
  • Mount: No mount
[joomdev-wpc-pros-cons disable_title=”yes” wpc_style=”wppc-view1″ title_tag=”H3″ title=”Title Here” pros_title=”Pros” cons_title=”Cons” button_text=”Get it now” disable_button=”yes” button_link=”” button_link_target=”_SELF” button_rel_attr=”dofollow” verdict_text=””][joomdev-wpc-pros]
  • Fantastic optics for such a low budget.
  • Great for astrophotography especially.
  • Wild field of view.
  • Great for deep-sky imaging.
[/joomdev-wpc-pros][joomdev-wpc-cons]
  • No eyepieces or diagonals included.
  • 142x is the highest magnification it can reach.
[/joomdev-wpc-cons][/joomdev-wpc-pros-cons]

Buy now

Orion 8297 8-inch f/3.9 Newtonian Astrograph Reflector Telescope

The Orion 8297 reflector-based Astrograph offers a more affordable price point that can’t be beaten for those who want to get into astrophotography. This observatory features an f3.9 focal ratio and a large aperture of 203mm, which makes it perfect for capturing detailed images from both celestial bodies as well as phenomena such as nebulas within our solar system! With its enhanced aluminum coatings with 94% specular reflection (which is excellent), plus black interior & dual-speed focuser – all contributing factors in producing amazing views/images.

Specs:Orion 8297 8 inch

  • Brand: Orion
  • Model: Orion 8297 8-inch f/3.9 Newtonian astrograph
  • Objective lens diameter: 203 mm
  • Focal Length: 800mm
  • Weight: 17.4 lb
  • Mount: No mount
  • Lens Coating Description: Enhanced Aluminum & Silicon Dioxide
[joomdev-wpc-pros-cons disable_title=”yes” wpc_style=”wppc-view1″ title_tag=”H3″ title=”Title Here” pros_title=”Pros” cons_title=”Cons” button_text=”Get it now” disable_button=”yes” button_link=”” button_link_target=”_SELF” button_rel_attr=”dofollow” verdict_text=””][joomdev-wpc-pros]
  • Captures excellent viewing images.
  • Enhanced Reflectivity.
  • Maximum image contrast.
[/joomdev-wpc-pros][joomdev-wpc-cons]
  • Difficult to use for beginners.
  • Portability is limited.
[/joomdev-wpc-cons][/joomdev-wpc-pros-cons]

Buy now

Explore Scientific ED80 Essential Edition

When you need an ultra-affordable triplet APO for your astrophotography, the ED80 Essential Edition is a great way to maximize value on a budget. It features an 80mm focal length and nearly perfect color accuracy that makes its images sharp enough to capture details like nebulas or galaxy clusters in crisp definition.

Specs:Explore Scientific ED80

  • Brand: Explore Scientific
  • Model: ES-ED0806-01
  • Objective lens diameter: 80 mm
  • Focal Length: 480mm
  • Weight: 10.5 lb
  • Mount: No mount
  • Lens Coating Description: Multi-Coated
[joomdev-wpc-pros-cons disable_title=”yes” wpc_style=”wppc-view1″ title_tag=”H3″ title=”Title Here” pros_title=”Pros” cons_title=”Cons” button_text=”Get it now” disable_button=”yes” button_link=”” button_link_target=”_SELF” button_rel_attr=”dofollow” verdict_text=””][joomdev-wpc-pros]
  • Affordable triplet APO refractor.
  • Good for long exposure imaging.
  • Light-weight and portable.
[/joomdev-wpc-pros][joomdev-wpc-cons]
  • Mount and tripod need to be purchased separately.
  • Accessories needed separately.
[/joomdev-wpc-cons][/joomdev-wpc-pros-cons]

Buy now

Explore Scientific Carbon Fiber ED102 f/7 APO Triplet with Hoya FCD100 Optics

The best apochromatic telescope for astrophotography is the Explore Scientific ED80. This big brother to our previous pick, The Pickering 8″ APO Triplet Refractor Telescope delivers amazing optical performance with its air-spaced triplets and 102mm aperture lens. If you can afford it spend more on your next purchase, this model will be worth every penny spent as the results are breathtaking.Explore Scientific ED102

Specs:

  • Brand: Explore Scientific
  • Model: FCD100-127075-CF
  • Objective lens diameter: 102 mm
  • Focal Length: 714 mm
  • Weight: 7 lb
  • Mount: Vixen Style
[joomdev-wpc-pros-cons disable_title=”yes” wpc_style=”wppc-view1″ title_tag=”H3″ title=”Title Here” pros_title=”Pros” cons_title=”Cons” button_text=”Get it now” disable_button=”yes” button_link=”” button_link_target=”_SELF” button_rel_attr=”dofollow” verdict_text=””][joomdev-wpc-pros]
  • High-quality optics.
  • Great for astrophotography and astronomy due to its aperture size.
  • Light-weight yet strong build.
[/joomdev-wpc-pros][joomdev-wpc-cons]
  • All of the accessories are sold separately.
[/joomdev-wpc-cons][/joomdev-wpc-pros-cons]

Buy now

Celestron Advanced VX 6″ Schmidt-Cassegrain Telescope

A beginner’s telescope is the perfect choice for those who want to start astrophotography. This bundle includes a Celestron Advanced VX computerized equatorial mount and 6″ Schmidt-Cassegrain (compound catadioptric) lens which will provide long exposure imaging as well as great visual observing capabilities in one package.

Specs:Celestron Advanced VX 6″ Schmidt-Cassegrain Telescope

  • Brand: Celestron
  • Model: 12079
  • Lens diameter: 150 mm
  • Focal length: 1500 mm
  • Weight: 47 lb
  • Mount: StarBright XLT
[joomdev-wpc-pros-cons disable_title=”yes” wpc_style=”wppc-view1″ title_tag=”H3″ title=”Title Here” pros_title=”Pros” cons_title=”Cons” button_text=”Get it now” disable_button=”yes” button_link=”” button_link_target=”_SELF” button_rel_attr=”dofollow” verdict_text=””][joomdev-wpc-pros]
  • Great for beginner.
  • Produces sharp images.
  • Portable.
[/joomdev-wpc-pros][joomdev-wpc-cons]
  • One eyepiece included only.
[/joomdev-wpc-cons][/joomdev-wpc-pros-cons]

Buy now

Sky-Watcher Classic 150P Dobsonian 6-inch Aperture Telescope

The Sky-Watcher Classic 150P is a great choice for beginners looking to get started with telescope viewing. It can also be used in single or short exposure astrophotography, making it perfect either way. The Dobsonian design makes this product easy enough even if you’ve never handled one before so there are no worries about handling equipment that may not feel right just yet – all functions have been simplified by software updates over time which means anyone should find themselves at home within seconds after opening up their package. You can also attach cameras or smartphones for great shots of planets.Skywatcher Classic150p

Specs:

  • Brand: Sky-Watcher
  • Model: Sky-Watcher Traditional Dobsonian 6″
  • Objective lens diameter: 152mm
  • Focal Length: 1200 mm
  • Weight: 33 lb
  • Mount: Alt-alt-mount
  • Lens Coating Description: Fully multi-coated pyrex mirrors
[joomdev-wpc-pros-cons disable_title=”yes” wpc_style=”wppc-view1″ title_tag=”H3″ title=”Title Here” pros_title=”Pros” cons_title=”Cons” button_text=”Get it now” disable_button=”yes” button_link=”” button_link_target=”_SELF” button_rel_attr=”dofollow” verdict_text=””][joomdev-wpc-pros]
  • Great beginner telescope for night-sky.
  • Lightweight and strong design.
  • Large aperture.
[/joomdev-wpc-pros][joomdev-wpc-cons]
  • Manual Tracking.
  • Long exposure astrophotography is not suited.
[/joomdev-wpc-cons][/joomdev-wpc-pros-cons]

Buy now

Celestron – NexStar 8SE Telescope Computerized Telescope

The Celestron NexStar 8SE is the most popular computerized telescope on the market, and for good reason. Let an expertly made product help you find thousands of stars to name just a few. With such accuracy, it’s no wonder that users love this amazing piece from Celestron’s family tree. Easily alignable in five minutes or less with perfect alignment ready once complete; this makes using your new telescope so easy even someone who never used one before can do so quickly because they’ll know exactly what goes where without any need for trial-and-error like other brands require when first getting started.Celestron Nexstar 8SE

Specs:

  • Brand: Celestron
  • Model: 11069
  • Objective lens diameter: 203 mm
  • Focal Length: 2032 millimeters
  • Weight: 23.8 lb
  • Mount: Altazimuth Mount
  • Power Source: Solar Powered
[joomdev-wpc-pros-cons disable_title=”yes” wpc_style=”wppc-view1″ title_tag=”H3″ title=”Title Here” pros_title=”Pros” cons_title=”Cons” button_text=”Get it now” disable_button=”yes” button_link=”” button_link_target=”_SELF” button_rel_attr=”dofollow” verdict_text=””][joomdev-wpc-pros]
  • Easy alignment.
  • Portable and convenient.
  • Easy setup.
[/joomdev-wpc-pros][joomdev-wpc-cons]
  • Expensive.
  • Power source upgrade is required.
[/joomdev-wpc-cons][/joomdev-wpc-pros-cons]

Buy now

How do you Choose the Best Telescope for Astrophotography?

The best telescope for astrophotography is not always the one that costs a lot of money. Many people don’t have enough cash on hand and need something affordable, yet still good enough for their needs as well. It can be difficult to find such an instrument without breaking your budget; however, there’s hope. A quality product won’t break anyone’s bank account if they know where to look.

Astrophotography doesn’t have to be a rich man’s hobby. This list is an affordable way for you to decide which one fits your budget and current needs, without sacrificing quality or artistic ability. You might find that some of the more expensive options on this article also lack certain features such as tracking but as long as we get beautiful results with our lenses then all will work out well in the end.

You can start with the cheapest options on this list, or you could also go for more expensive telescopes. It is best to learn how things work before investing too much money into one item and then learning all its features later down the line when it may be outdated or not needed anymore due to new technology coming out soon enough.

For those who want to get started with photography, but don’t know where or how to start, do some research on what kind of shots you’re interested in taking and your budget for a system that’s comfortable and suitable. You’ll waste time if we’re not clear about which features are essential – then stick within these boundaries.

Conclusion

In this blog post, we took you through the best telescope for astrophotography available on the market today. Whether it’s a telescope that fits your budget or needs an upgrade, one of these will work perfectly with your new hobby. If you’re just starting and don’t know where to start, take a look at our recommendations here. We hope you found something helpful in this article.

Faqs:

Q1: Which telescope size is better for stargazing?

The 4-inch refractor is a versatile and popular choice for beginners, as it provides deep-sky objects about the same performance level as many larger telescopes. It’s also good enough to see planets with.

Q2: Which telescope size is better for astrophotography?

If you want to observe galaxies with your own eyes, there is nothing better than using an 8-inch telescope. The beauty of the night sky can be admired through large-format telescopes that let people see things in more detail than they would otherwise if viewing them through small telescope sizes.

Q: Which telescope type is good for viewing planets and galaxies?

A good quality telescope is the best way to view planets. A scope with a diameter of 3 inches up to 6 will provide beginner amateurs with great views. A beginners’ guide would recommend using either refracting or reflecting optics, depending on your personal preference and skill level: both can be very enjoyable experiences that allow you to see objects in all corners within our solar system.

Q: What can we see through a 70mm telescope?

The four major moons of Jupiter, including its bands and belts, are clearly visible in a 70mm telescope. Saturn’s rings can also be observed with ease when viewed through the eye-catching colors that contrast beautifully against their dark background. Mars is not too difficult to spot even though it is brighter than any other celestial body because its brightness gives way easily; Venus on the other hand does not reveal much detail due to being so bright.

Q: How many galaxies can be seen through a telescope?

When astronomers used the Hubble Space Telescope, they found that there are an estimated 100 billion galaxies in existence. It is a telescope orbiting in space.

Q: What are the main types of telescopes?

A telescope is an optical instrument that aids in the observation of celestial bodies. There are three main types: refracting, Newtonian, and Schmidt-Cassegrain telescopes which each have advantages depending on what you’re looking for.